Thursday, October 17, 2013

Ovarian Cancer Online Quilt Auction


The online auction starts in less than a week!!! Its time to start the countdown! 6 days and counting! In the meantime-------------------
PLEASE VOTE for your favorite Cherrywood quilt at http://on.fb.me/1fCSTqJ 
Cherrywood Hand-Dyed Fabric donated 24 packets of fat eighths from their "Minnesota Bundle", which includes colors from lake blue to forest green to golden brown to barn red.
We invited 24 fiber artists to design and create a quilt specifically for the MD Anderson Ovarian Cancer Quilt Project. It's been amazing to see what beautiful, unique quilts were created from the same packet. Thank you to all of our quilters.

Thursday, October 3, 2013

Giveaway winner!

Oops, I totally forgot to pick a winner of the Grandmas Lawn Chair pattern!! I asked my hubby to pick a number and he picked 17, so Cecilia is our winner! I've already emailed you a copy of the pattern! Thanks to everyone for stopping by!

Monday, September 23, 2013

Grandma's Lawn Chair Blog Hop & Giveaway!

Grandma's Lawn Chair Blog Hop @ from blank pages...

My talented friend Diane over at From Blank Pages has designed her first quilt pattern called Grandma's Lawn Chair.  Check out her Craftsy page because she also has some awesome paper piecing patterns as well!
 
 The pattern was very detailed and has lots of illustrations!
Diane has thought of everything for this pattern and the instructions have three different sizes. I chose to do the toddler size.  My sister-in-law is pregnant and having a little girl in January, so I thought this was a great pattern to use for her baby quilt!  The pattern went together super fast! I got the top together (including cutting) in one day! Well, sporadically on one day between naps and after Jared went to bed!
Here is the quilt top I made and I love how it turned out!

 
I haven't had time to quilt it yet, but that's on my list for this week!
If you're interested in purchasing Diane's Grandma's Lawn Chair, you can purchase it on Craftsy or Etsy!
 
Included in the pattern:
  • Table of Contents
  • A few tips regarding the fabric you choose.
  • Cutting instructions for three different quilt sizes: Baby, Toddler, and Lap size.
  • Tips and instructions for using directional prints as well as directional prints for the background fabric.
  • Cutting instructions include how to cut from yardage, as well as how to cut from fat quarters (or fat eights for the baby size).
  • Piecing instructions.
  • Fabric variations and color schemes, as well as a key for cutting if using scraps.
  • LOTS of diagrams
  • Coloring pages for all three sizes so you can play around with your layout before cutting any fabric.
 
Great pattern Diane, and thanks for letting me be a part of the blog hop!!
Make sure you check out all of the other stops on the blog hop as well!

Mon 9th - Diane @ from blank pages...
Tues 10th - Julie @ Jolie Maxtin
Wed 11th - Ginny @ Fishcreek Studio
Thurs 12th - Kelleigh - guest blogging at from blank pages...
Fri 13th - Sara @ Sew Sweetness

Mon 16th , Diane @ from blank pages...
Tues 17th - Hilary @ Young Texan Mama
Wed 18th - Mike @ The Amateur Quilter
Thurs 19th - Rachael @ imagine gnats
Fri 20th - Courtney @ Mon Petite Lyons

Mon 23rd - Jamie @ Sunflower Seeds
Tues 24th - Alyce @ Blossom Heart Quilts
Wed 25th - Krista @ Spotted Stones
Thurs 26th - Cristy @ Sew Much Like Mom
Fri 27th - Diane @ from blank pages...


Diane is nice enough to let me give away a PDF copy to one lucky reader! I will choose a winner next Monday Sept. 30th!  Leave a comment below and you will be entered to win!


Friday, September 13, 2013

Pathway Through The Stars and a Craftsy Class

A few months ago my guild, the STLMQG, issued a new challenge called The Ohio Star Challenge. The rules were to Make a Modern Quilt by using the Traditional Block "Ohio Star" and you can read more of the details here. Our meeting is tomorrow but I wanted to post about my quilt(s) today because tomorrow is going to be super busy/long and Sunday I probably won't have the energy to blog about it either.
This is what I came up with and my Dad named it Pathway Through The Stars! I loved how the first one turned out so much that I made a second one!
 
One of the reasons why Saturday is going to be so busy is that our best friend Matt is getting married to his beautiful bride Shannon. Their wedding colors are peacock colors so I pulled these solids to make a quilt for them! This was the second challenge quilt I made and I'm glad I did, because the Ohio Star stands out better using the solids than the prints. BUT I love them both equally and if it wasn't our best friends wedding I might keep this one! :) Love ya'll and can't wait to celebrate God's joining of two awesome people tomorrow!


Here is the back of the quilt and close up of the straight line quilting.

 
The second Pathway Through The Stars uses all prints! I have been hoarding some of these fabrics for YEARS and let me tell ya, it felt good (and a little scary) to cut into them!


I used a new Free Motion Quilting technique to quilt this and it was so fun with gorgeous results.
The awesome Angela Walters has a new class over on Craftsy called Dot to Dot Quilting. In the class she teaches how to FMQ these simple line designs with stunning outcomes! The class was really informative and fun. I found these designs to be simple and kinda relaxing! I also mixed in some other FMQ designs like pebbles and swirls.  I HIGHLY recommend this class and thanks Angela for another fun one! (Plus, it's on sale right now! So, hop on over and check it out!)
Below are photos of the quilting:


This will be a new pattern soon....let me get through this weekend first! I hope ya'll like it and thanks for the awesome challenge STLMQG!

Thursday, August 15, 2013

Giveaway Winners (a little late)

Sorry this post is a few days late.  We are hosting a foreign exchange student from China this year and the first day of school was today, so it has been a little crazy around here! Anywho, I'll write more about that later...on to the winners!
I'm posting all four winners, two from my blog and two from my mom's blog!
 
And thanks to random.org, the winners are......
The Moda F8 bundle goes to.....Callie Applestein
 
The Dear Stella FQ bundle goes to......Nancy Williamson
 
And a Moda Charm Pack goes to.....Lisa Marie and ScottyLover
 
I will be emailing you shortly for your mailing info!! Congratulations!!!
 
Thanks again to everyone who participated in the blog hop!!!

Tuesday, August 6, 2013

Sewing Accessories Blog Hop Giveaways!

A BIG THANK YOU to all of the participants in the Sewing Accessories Blog Hop! This has been so much fun sharing the projects from our book with everyone and we LOVE seeing ya'lls creations!!!
Be sure you check out all of their blogs to see what they come up with...
July 8th- Steffani www.sewwithsass.blogspot.com
July 15th-Janice www.betteroffthread.com
 
Thank you to everyone who has already purchased a book and if you would like to purchase a copy you can do so on Amazon, Barnes and Noble or of course Our Website!
If you make a project from the book, please share a photo in our Flickr Group or if you Instagram #SABlogHop because we'd LOVE to see it!!!
 
This is the last week of the blog hop and as promised, we have some AWESOME giveaways to share!
First up, the fantastic people at Moda sent us a couple goodies to share!

2 charm packs of Chez Moi's new line Mimi
this line has a special place in my heart because 1. Chez Moi is my sister's favorite designer and 2. Jared calls my Mom "Mimi". I wish I didn't have to give these away but I will be stocking up on this line, it's so pretty, and that's how much I love my followers!

Then, they also sent a Fat 1/8th bundle of S'more Love by Eric & Julie Comstock.  This line is too cute and I love the colors!


Then, the awesome people at Dear Stella sent us this gorgeous Fat Quarter bundle of their new line Paloma.  The fabric has the cutest birds and their fabrics are so soft!! Again, I wish I could keep this for myself!
 
Ok, so for the giveaway, leave a comment on this post telling me your favorite project from our book! You can also leave a separate comment telling me you follow my blog, facebook, twitter, or instagram for extra chances! Then, hop on over to my Mom's blog for more chances to win!
 I will be choosing 2 winners and my mom will also choose 2 winners! 
 
Thanks again for a great Blog Hop and we will announce winners Monday August 12th!


Thursday, August 1, 2013

Sewing Accessories Blog Hop Week 4!

 
Wow, I can't believe it's already week 4...only one more week left!
I would like to introduce Diane over at From Blank Pages this week! She did an amazing job on our Pincushion Caddy!  It's looks awesome Diane, the fabrics are gorgeous, you're so talented!!  Thank you for being a part of our blog hop! Make sure you stop by Diane' blog for a chance to win a copy of our book!
 
This week I will be sharing our Iron Table


This little table is great to take with you on sewing retreats or just to keep by your side at the sewing machine while piecing lots of smaller pieces.  I love having this next to me while I'm paper piecing or making a lot of similar blocks.
 
Fabrics uesd: Moda home dec rulers
 
To see more projects from the book, check out the other stops on the Blog Hop:
July 8th-Steffani at www.sewwithsass.blogspot.com
 
July 15th-Janice at www.betteroffthread.com
July 22nd-Jamie at www.jamespurejoy.blogspot.com
 
 
You can purchase a copy of the book at these great retailers today! Sunflower Quilts, Amazon, Barnes and Noble and Annie's Publishing.

Be sure to come back next Monday for lots of giveaways from Moda and Dear Stella!!

Wednesday, July 24, 2013

Sewing Accessories Blog Hop Week 4!

Howdy everyone and welcome to week 4 of the Sewing Accessories blog hop!

 
This week, the talented Jamie over at Pure Joy is sharing the Sew on the Go Tote bag and giving away a copy of the book!  She did an amazing job on the bag and thanks Jamie for being a part of the blog hop!!  Be sure ya'll check out her blog and leave a comment!
 
 
This week I'm sharing the Hanging Ruler Organizer.

 
This ruler hanger holds all of your rotary cutting rulers and hangs on your wall!  The bottom pocket holds your 6" X 24" ruler and the top pocket holds your 15" an 12 1/2" square rulers.  I couldn't wait to get this project back from the publisher, I LOVE having all of my rulers hanging in one spot on the wall in my sewing room! 
 
Fabrics used: Oh Deer! by MoMo for Moda
 
The remaining schedule:
You can purchase a copy of our book on our website, Amazon, Barnes and Noble and Annie's Publishing.
 
If you make something from the book, we would LOVE to see it, so make sure to add a photo to our Flickr Group!


Wednesday, July 17, 2013

Sewing Accessories Blog Hop Week Three


Don't forget, The amazing Janice over at Better Off Thread has another great project from the book! Be sure you hop on over to Janice's blog and give her don't forget to leave a comment because she's giving away a copy of the book! Thank you Janice for being part of this blog hop!
 
 
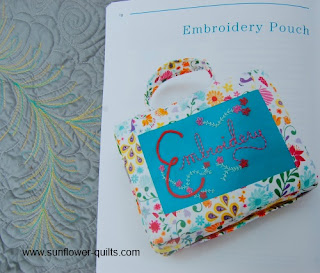
This week I'm sharing our Embroidery Pouch project!


The Embroidery Pouch is perfect for all of those hand projects you work on! The Embroidery Pouch is perfect for the travel sewist with a handle and zipper enclosure. This pouch has lots of pockets inside to hold all of your embroidery items: floss, needles, scissors and your hoop!  And if you make the Embroidery Tote from the book, this pouch will fit inside!  Check my Mom's blog to see more about the Embroidery Tote!

 
Fabrics used: Kate Spain's Cuzco by Moda
 
 
Here is the remaining schedule for the Sewing Accessories Blog Hop:
You can purchase a copy of our book on our website, Amazon, Barnes and Noble and Annie's Publishing.
 
If you make something from the book, we would LOVE to see it, so make sure to add a photo to our Flickr Group!


Monday, July 15, 2013

Sewing Accessories Blog Hop Week Three


It's week 3 of the Sewing Accessories Blog Hop and the amazing Janice over at Better Off Thread has another great project from the book!  Be sure you hop on over to Janice's blog and give her some comment love, she's giving away a copy of the book!  Thank you Janice for being part of this blog hop!


Wednesday, July 10, 2013

Sewing Accessories Blog Hop Week Two...Con't....


Hopefully ya'll hopped on over to Steffani's blog to see the adorable Iron Caddy she made! I absolutely love the fabrics she used, they are perfect!  If you haven't seen it, make sure you hop on over and leave her a comment to win a copy of our book!
 
Today I am sharing our Armchair Caddy/Pincushion
 
 
This Armchair Caddy comes in handy for all of those hand sewing projects you might have!  Whether you're hand sewing the binding, English Paper Piecing some hexagons, or doing some embroidery or applique, this caddy will hold all of your essential items.  There are two pockets to hold scissors, thread, or anything you might need and there is a convenient pincushion on top for your needles and pins.  We used flannel on the bottom so it will stay put nicely on the armchair of your couch or recliner!
 
Fabrics used: Tula Pink's The Birds and The Bees
 
Be sure to hop on over to Steffani's blog and my Mom's blog for more book projects!
 
Here is the remaining schedule for the Sewing Accessories Blog Hop:
July 15th-Janice www.betteroffthread.com
You can purchase a copy of our book on our website, Amazon, Barnes and Noble and Annie's Publishing.
If you make something from the book, we would LOVE to see it, so make sure to add a photo to our Flickr Group!


Monday, July 8, 2013

Sewing Accessories Blog Hop Week Two!


Howdy Friends, it's week two of the Sewing Accessories Blog Hop! 
Up this week my talented friend Steffani over at Sew With Sass!  Make sure you stop by her blog to check out what she made and give her some love. She will be giving away a copy of our book so make sure you check that out too!  Thanks Steffani for being a part of the blog hop and sharing your talent with everyone!

Monday, July 1, 2013

Sewing Accessories... Blog Hop Week One!

 
Welcome to week one of the Sewing Accessories...Blog Hop for our first book Sewing Accessories at Home and on the Go!  Thank you to Annie's Publishing for helping our book dreams come true! We are so excited to share this book with everyone and can't wait to see the projects ya'll create!


Each week (every Monday) during the Sewing Accessories...Blog Hop Mom, myself and a special blogger friend will share a different project from the book with you.  Each of the special bloggers will be giving away a copy of the book to a lucky reader so make sure you stop by their blogs and give them some love!
 
Here is the schedule for the Sewing Accessories....Blog Hop:
July 8th- Steffani       www.sewwithsass.blogspot.com
July 15th-Janice                    www.betteroffthread.com
July 22nd-Jamie                    www.jamespurejoy.blogspot.com
July 29th-Diane                     www.fromblankpages.blogspot.com
 
This week I am going to share with ya'll our Sew on The Go Tote Bag!
 
This is one of my personal favorites from the book! I mean, who doesn't love a giant bag??  A little back story from how we came up with this big ole bag...I am a member of the awesome St.Louis Modern Quilt Guild and 4 times a year we have an all day sew-in where you can bring lots of sewing projects to work on and socialize with your friends (they are so fun!). Anywho, I wanted a bag to carry all of my stuff in so I didn't have to make lots of trips from my car to the building. The Sew on the Go Tote is the bag for such a reason!!! 
 
The Sew on the Go Tote has a front pocket to hold an 18" X 24" rotary cutting mat, the inside has pockets to hold a 15" square ruler, 12 1/2" square ruler, 6" X 24" ruler and a rotary cutter. It's also large enough to hold your sewing machine or some sewing projects inside!
 
To show you how big this bag is, my cat Ozzie is over 20 pounds...

 
Here is my bag holding my sewing machine..
 
Fabrics used: I used Dear Stella Bukhara and solids for the bag in the book and Tula Pink's The Birds and The Bees for a second bag.
 
Be sure to stop by my Mom's (Jill) blog today for another project from the book and come back next Monday for more projects and a giveaway on Steffani's Blog!
 
You can purchase a copy of our book on our website, Amazon, Barnes and Noble and Annie's Publishing.
 
If you make something from the book, we would LOVE to see it, so make sure to add a photo to our Flickr Group!


Thursday, June 13, 2013

Sewing Accessories at Home and On the Go Blog Hop!!

Announcing the Sewing Accessories at Home and On the Go Blog Hop!
 
 
Starting on July 1st, every Monday through August 5th we are having a blog hop to share projects from our new book! Here is a schedule and list of awesome people involved!
July 1st-Jamie and Jill        www.jamiemueller.blogspot.com & www.constantlyquilting.blogspot.com
July 8th- Steffani                www.sewwithsass.blogspot.com
July 15th-Janice                  www.betteroffthread.com
July 22nd-Jamie                  www.jamespurejoy.blogspot.com
July 29th-Diane                   www.fromblankpages.blogspot.com
Each awesome blogger will share a project from the book that they made AND they will be giving away a copy of the book!   Plus, Mom and I will be sharing ALL of the projects from the book throughout each week giving away lots of fun stuff sponsored by Moda and Dear Stella!
Thank you to everyone who has already purchased a book and if you would like to purchase a copy you can do so on Amazon, Barnes and Noble or of course Our Website!
 
If you make a project from the book, please share a photo in our Flickr Group or if you Instagram #SABlogHop because we'd LOVE to see it!!!
 
Thank you to the awesome bloggers and sponsors for participating in our blog hop and make sure ya'll come back Monday July 1st for the first post!!


Monday, May 20, 2013

Brick Road Sew Along Winners!

Thank you to everyone who participated in the Brick Road Sew Along! I had so much fun watching the progress with all of the photos in the Flickr Group; lots of beautiful quilts and fabrics!! I am using your Flickr usernames to announce winners. I numbered every photo in the Flickr Group and used good old random.org and the winner of the RJR fabric is.....Kathy Parks!!!
Congrats Kathy,  I will be sending you a message through Flickr soon, so be on the lookout!
 
 
And I decided to choose two winners for the SunFlower Quilts patterns!!
I will also be sending you a message through Flickr soon,so be on the lookout! You each get to choose one PDF pattern from our website! 


Congratulations to all of the winners and thank you so much for participating!! Click on their names to see their awesome Brick Road quilts!  Come back later this week and I'll show another quilt made with all RJR solids!
 

Tuesday, May 14, 2013

Binding Tutorial


Today we are going to talk about binding! I love binding so much, it's fun to make and I love being able to sit down on the couch and hand stitch the binding to complete my quilt! Let's get started...
 How much fabric do I need for the binding?
To figure how much fabric needed for binding (based on width  of fabric) take the total number inches of all four sides and add 15” (for turning corners and connecting ends). Take that measurement and divide by 42” (42” is the width of the fabric). That will tell you how many binding strips you will need and the amount of fabric yardage.
  Example: Brick Road Quilt Size: 63” x 78”
                     63 + 63 + 78 + 78 = 282” + 15” = 297” total
                     297 ÷ 42 = 7.071 (round off to next highest number)
                     You will need 8 binding strips
 
                     Cut binding strips 2 ½” (this is your preference, but I like to cut 2 1/2" binding strips, I find that this width works the best)
                     Multiply 2 ½” x 8 (number of strips = 20”)
                     You will need to purchase 5/8 yard (or 22.5”) of binding fabric
 
 Preparing the Binding:
  1. Cut 8 – 2 ½” x width of fabric strips. Before moving strips, cut off selvage.
  2. Take 7 of the strips and on one short end of each strip, fold a 45° angle towards the right, wrong sides together. Press. (the pressed crease will be your stitching line) See diagram.  

3. Lay one end of the strip not pressed right side up with 1 short end at top.
4. Open up one end of the pressed strips and lay on top (of strip from step 3) right sides together to the left side of the unpressed strip. Pin. Stitch on the 45° pressed line. See diagram.


5. Take the next 45° pressed strip, placing on the unpressed end of the previous sewn strip. Repeat until all strips are sewn to make one continuous strip.
6. Trim off excess fabric ¼” from seam of all sewn strips. Press all seams open. See diagrams.


7. Take the long continuous binding strip and fold in half wrong sides together. Press entire strip being careful not to distort.
8. Now you will square the binding strip to 1 1/8” wide by placing the 1 1/8” ruler line on the fold side of the binding strip. Trim off excess binding (raw edge). Do this for entire binding strip.. This is an important step to ensure a straight, even binding. See diagram.
       
      Sewing the Binding to the Quilt:

    2. Use a walking foot to attach binding to quilt to avoid puckering of quilt layers.
    3. Start on front of any side of quilt (not at a corner) by laying binding strip on edge with raw edges of binding on edge of quilt. Start by leaving 6” – 8” of binding as a tail that will be joined at the end. See diagram.
 
    4. Sew strip with ¼” seam allowances all the way to the first corner, stopping ¼” short of edge. Cut thread.  See diagram.

    5. Fold binding away from quilt to form a 45° miter at corner. Fold binding back over quilt square to the edge going down the next side. See diagram.

    6. Start sewing from the edge all the way down to the next corner. Repeat Step 5 for all corners and stop sewing 15” – 20” short of where you started.   See diagram.
 

    7. To connect ends, lay binding loose ends down on quilt and fold back leaving ¼” gap between folds. See diagram.
 

Cut one end off at fold on right side. Open out cut piece and lay under other folded side to measure cut line of left strip. To join, open right side strip end and lay right side up. Open left side and fold left end corner over wrong sides together and press as you did in joining strips together. Open, lay on other strip right sides together, pin, and sew on pressed line. Be careful not to get strips twisted. Cut off excess fabric ¼” from seam, press seam open and sew strip in half wrong sides together. Lay strip to edge of quilt and finish sewing down.  See diagrams.


    Hand Stitching Binding to Back of Quilt:
    1.       Hand stitch to back of quilt using hand quilting thread color that matches the binding fabric, being sure not to stitch all the way through to the front of the quilt. I like to stitch every 1/4" or so to secure nicely!
     
     
    Ok, that's it for the Brick Road Sew Along!  Now, go finish your quilts and upload them to the Flickr Group to be in the drawing for all of the awesome prizes including: RJR Fabrics and SunFlower Quilts patterns!!


    Thank you for participating in the Brick Road Sew Along and I've loved watching your progress and seeing your photos! 
    Also, a HUGE thank you to RJR Fabrics for the Cotton Solid Supreme fabrics, they are wonderful to work with and ya'll are great too! :)